An introduction to Morphic: Self's UI toolkit
In my previous two posts, I talked about Self as the language, and the system which allows it to serialize objects into text format. Now let’s talk about another big part of Self, which is the programming environment and the UI toolkit that it is created from: Morphic.
What is Morphic?
Morphic is an abstract UI toolkit built for Self. It has backends for X11 and
Quartz, for GNU/Linux and macOS respectively. It is based on the idea of
morphs, which are known as widgets in modern UI toolkits. The difference here,
obviously, is the prototypical approach; it is after all written entirely in
Self, and so employs a prototypical-inheritance programming paradigm. All morphs
have a family tree that can be traced back to the original morph which
provides the building blocks for implementing your own morphs.
Now, consider this scenario: an update to Morphic is made (this scenario is
hypothetical), and a new field is added to the root morph object which must
propagate to all other morphs and is needed to display the morphs. Or a simpler
scenario; you want to change a default for all morphs and you want this change
to propagate to all other morphs. However, you might remember that we previously
talked about how instances in Self work and specifically, how they work by
copying a prototype. So how can we easily propagate new slot information from
parents to copied children? The answer is copy-downs.
Copy-downs
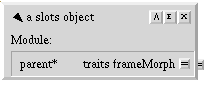
“Copy-down” is what Self calls replicating slots that exist in another object, and updating those slots when that object changes. You may remember in the previous post that an object had a few slots related to copy-down in its annotation section.
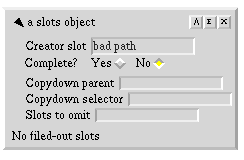
The annotations that are available on an object.
In the previous post we ignored these, but when programming in Morphic copy-downs are important, so I’ll go into detail here. Copy-downs work by sending the “copy-down selector” as a message to the “copy-down parent” (which is an object), and then copying down the slots (except the ones listed in “slots to omit”). This allows changes to parent objects to propagate as long as the change is not omitted. This is similar to “sub-classing” in that it “inherits” slots from a parent.
Copy-down is not a part of the Self language, but instead of the programming environment that comes with it, and its implementation is done entirely within annotations and the mirror system (we’ll look into mirrors later, just know that mirrors are Self’s reflection system).
The handbook section about copy-down gives some important information about copy-downs, but nothing that is really omitted here. At the end it mentions this:
The least convenient aspect of using copy-downs is that to do the moral equivalent of creating a subclass, the programmer has to create two objects: a new traits object, and a new prototype, and then set the object annotation of the new prototype. Perhaps someday there will be a button to do this, or perhaps other styles of programming will emerge.
It turns out this document is outdated, as we do have a way to do this in Self now which we will take advantage of in a short bit, when we start building our own morph. For now, let’s take a look at what a morph actually is.
The anatomy of a morph
When we get the root morph prototype by typing morph in the shell and then
“Get it”, we get this object:
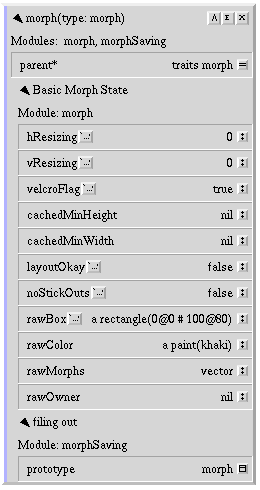
The prototype
morph.
Most of the slots here isn’t of concern to us, because they are managed automatically by Morphic when we send it messages (either directly with an evaluator, or by interacting with the morph directly). A few points that might be interesting are:
hResizing/vResizing: These determine how the object sizes itself according to its parent or its children. There are three modes of resizing in Morphic, which are:- Rigid: The object stays at its defined width and height and does not change its size based on its surroundings, parents or children.
- Shrink-wrap: The object resizes to wrap around its contents, and does not grow larger.
- Flexible (or space-filling): The object enlarges to fill available space. If multiple sibling objects have this property, they all distribute the width/height equally.
noStickOuts: Morphic optimizes drawing if the morph is a simple rectangle with nothing sticking out of it.velcroFlag: Kind of a weirdly named one. If this istruethen the submorphs of this morph cannot be yanked from the morph, and you cannot drag-and-drop new submorphs to this morph.
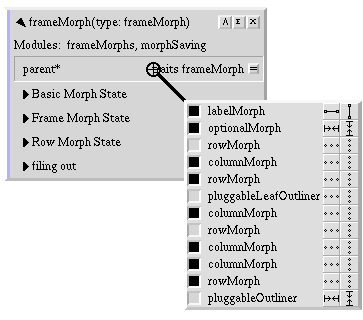
Different “subclasses” of morph have their own unique slots. Thankfully,
the authors of Morphic have categorized each morph’s slots such that a morph
that is copied down from another will have its unique slots under a separate
category, which makes it a lot easier to see what belongs to which morph.

The
frameMorph is copied down from rowMorph, which was
itself copied down from morph. Each link in the chain categorizes
its own slots separately.
Each morph may only appear once. If you use “Show Morph” on an outliner for a morph that already exists somewhere else, it will remove itself from there and attach it to your hand (similar to the Javascript DOM in this respect).
A useful tool: the core sampler
As it stands, a complex morph with many submorphs in it is hard to inspect. The
submorphs of a morph are hidden inside a vector called rawMorphs and there’s
no easy way to display a tree of what submorphs are available in a morph.
Luckily, there is a tool in the Self programming environment that allows us to
easily inspect a submorph and its parents: the core sampler.

Core sampler in the idle state.
The core sampler will list all the morphs under its “magnifying glass” (the crosshair), starting from the innermost one up to the outermost. Each entry in the list allows you to see its color, and to see and modify its resizing mode. You can also middle-click an entry to access the morph’s properties panel and also get an outliner for the morph.
A core sampler listing the submorphs in an outliner, with their colors (on the left) and their resize modes (two buttons on the right).
To access the core sampler, simply right-click any existing morph and select
Core sampler....
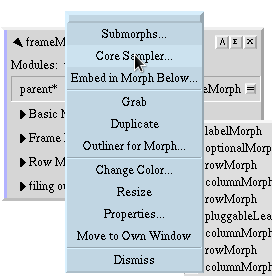
Opening the core sampler.
The core sampler is extremely helpful to figure out why a submorph is misbehaving, because you can directly see its hierarchy and open an outliner for it, debugging the morph as it operates. This is one of my favorite parts of Self, because you interact with the system while it’s running, having all debugging info at hand.
Now that we looked into Morphic, let’s build something with it.
Building an application with Morphic
Let’s build a desktop calculator. It’s better than a toy example (because it
actually does something) while being simple enough that this post won’t become
too long (longer than it already is, anyway). The hierarchy of the final
calculatorMorph is presented below.
calculatorMorph
    columnMorph (layout)
        rowMorph (titleBar)
            labelMorph (title)
        uglyTextEditorMorph (editor)
        rowMorph (buttonRows at: 0)
            buttonMorph ('(')
            buttonMorph (')')
            buttonMorph ('CE')
            buttonMorph ('+')
        rowMorph (buttonRows at: 1)
            buttonMorph ('7')
            buttonMorph ('8')
            buttonMorph ('9')
            buttonMorph ('-')
        rowMorph (buttonRows at: 2)
            buttonMorph ('4')
            buttonMorph ('5')
            buttonMorph ('6')
            buttonMorph ('*')
        rowMorph (buttonRows at: 3)
            buttonMorph ('1')
            buttonMorph ('2')
            buttonMorph ('3')
            buttonMorph ('/')
        rowMorph (buttonRows at: 4)
            buttonMorph ('.')
            buttonMorph ('0')
            buttonMorph ('BS')
            buttonMorph ('=')
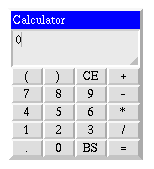
Our finished product.
Let’s start out by copying frameMorph, which provides a rectangular frame
around its contents. Open a shell with New shell... from the background menu,
and type in frameMorph then “Get it” to get the frameMorph prototype.
The
frameMorph prototype as we saw it earlier.
Earlier we talked about copy-downs and said this is how we create “sub-classes”
of morphs. We will now copy-down frameMorph as the basis of our
calculatorMorph. Middle-click frameMorph’s header and click "Subclass" Me
(this is the easy method of copying down we talked about earlier). When asked
for a copydown selector, leave it as the default and click “Okay”.
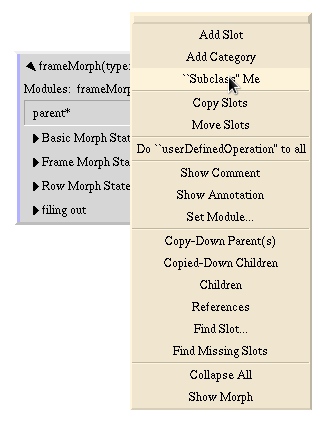
“Subclassing”
frameMorph.

The copydown selector dialog.
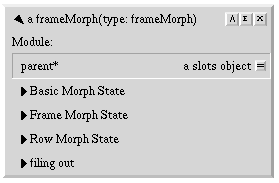
Our
frameMorph “subclass”. Notice the “a” before the name.
You can now dismiss the original frameMorph either with right-click >
“Dismiss” or with the X on the top right.
Now that we have the basis for our calculator, we can display it! Middle-click the header of our newly created morph, and click “Show Morph”. A little blue square should be attached to the cursor, which we can simply drop to any empty spot.

Our “calculator”.
Of course, we want it to look like a part of our Morphic system, so let’s pick a
better color for it than blue1. Open the evaluator on our morph’s outliner,
and enter color: paint named: 'lightGray'. and then “Do it”.
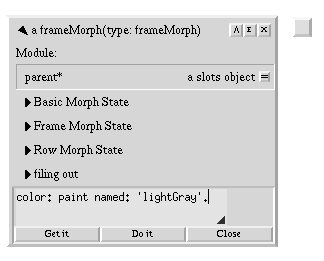
Recoloring the morph.
color: is a message that is provided to us by traits morph. You can evaluate
traits morph in the shell to see what functions are available. Be warned, the
traits morph object is quite large and it can be hard to find a specific thing
you’re looking for, but it is categorized like most other standard library
objects.
Now let’s define a few slots that we will be using (under a new category, so we don’t get confused later down the line). Above in the hierarchy I put a few names in parenthesis for the morphs that we will hold a reference to. Create the category by selecting “Add Category” from the object menu, then create slots on it by middle-clicking the category and selecting “Add Slot”2.

Creating new slots in our morph.
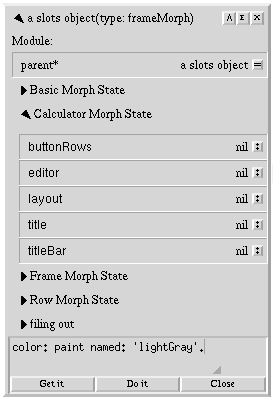
The finished slots.
Before we proceed further, let’s set the resizing mode of our calculator. By default, it is in flexible mode, but we want it to wrap around its contents. There are two ways of changing the resizing mode:
- From an evaluator by typing
beShrinkWrap. - Putting a core sampler on it and changing its mode using the buttons.
I personally chose the former as it is faster for me, but you can do it however you like.
Now let’s create the layout morph for our calculator. We want to layout the
title, the editor and then the buttons vertically, so we will use a
columnMorph which allows us to put multiple rows below each other. Copy
the columnMorph prototype and set the layout slot to it, and then add it to
our calculator morph.
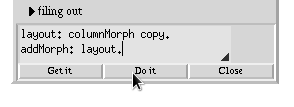
Adding
layout to our calculator.
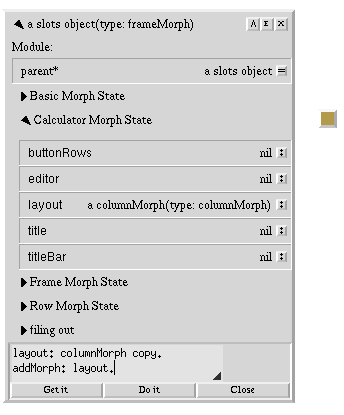
After addition of
layout.
By default columnMorph comes with an ugly brown-ish color. We can set it to
not display color at all, by evaluating
layout color: paint named 'transparent'.
While we’re at it, let’s make it also shrink-wrap its contents by evaluating
layout beShrinkWrap3.

Setting
layout’s color.
Now let’s create the title bar. First, we will create the labelMorph with the
label Calculator and make it white in color and with a font size of 12. Then
we will create a rowMorph for titleBar and set its color to blue. Finally,
we will add title to titleBar, and add titleBar to layout.
title: labelMorph
    copyLabel: 'Calculator'
    FontSpec: (labelMorph fontSpec copySize: 12)
    Color: (paint named: 'white').

titleBar: rowMorph copy beFlexible borderWidth: 2.
titleBar color: paint named: 'blue'.

titleBar addMorph: title.
layout addMorph: titleBar.
Setting the title.
(You may not agree with my stylistic choices, of course. Feel free to mess around
with the colors and font sizes. If you mess up along the way, evaluate
removeAllMorphs to clear the submorphs and restart from the layout section.)
Now let’s add the editor morph, which will be our calculator display. The
handbook
gives us two options from the available morphs as editors: editorMorph which
is a regular text editor (that can hold morphs as well as text!), and
uglyTextEditorMorph which only holds text but is higher performance. I
personally prefer the uglyTextEditorMorph, because it is what is used in the
evaluator and I think it looks cooler.
"offWhite is the color that the evaluator uses for the editor."
editor: uglyTextEditorMorph
    copyString: '0'
    Style: (| color = paint named: 'offWhite'. |)

layout addMorphLast: editor.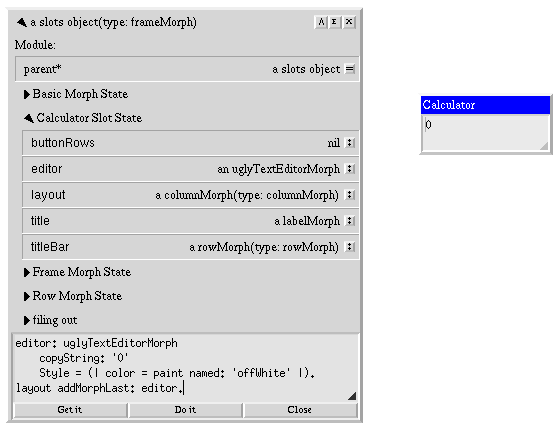
Adding the display to the calculator.
Finally, we will build our buttons. I have decided to arrange the buttons as 5 rows of 4 buttons each. But that’s 20 buttons! Should we really have to type out the initialization of all of those buttons manually?
Well, there’s a better way. If you check out the outliner of our calculator, you
will notice that parent* points to a slots object. If you click on the
button next to it, it will bring up a separate object.
Our calculator’s parent.
This object is what is known as a trait object. You may have seen some of
those if you have explored the Self environment for yourself a little bit. If
they are within the global traits object, the outliner will mark it as a trait
by coloring it purple on the left edge. However, as the comment on the traits
object says, not all traits have to be in this object and many objects store
their traits privately on their prototype (still accessible, but not registered
as an “official” trait).
In Self, a good style is to always separate the changing parts of an object from
unchanging parts. Unchanging parts would be code, and changing parts would be
data, like the rawBox property on our calculator morph. Code will change very
rarely, and when we need to change functionality we can just create a new object
that refers to our original traits object and refer to that with a parent slot;
however, data will change very frequently as we copy, and it would be wasteful
to copy the code everytime we want to create a copy of the prototype. To solve
this, we use trait objects for code and prototypes for initial data.
When we “subclassed” the frameMorph to create our calculator morph, Self
automatically created a new traits object for us that references
traits frameMorph and attached it to our newly created morph. This allows us
to quickly add new methods to our calculator morph. So let’s add a convenience
method to quickly build a button for us.
One last thing you need to know that buttons in Morphic need a target (an
object to execute their action on) and a script (code that will execute when
the button is pressed). In the script, you can refer to target to refer to the
object that the button is targetting.
With all of that out of the way, let’s add buildButton:Script: on our trait
object:
buildButton: label Script: s = (| b |
    "Create the new button."
    b: ui2Button
        copyColor: (paint named: 'lightGray')
        Target: self.
    "Make it flexible, set its label and script. , is the concatenation operator."
    b beFlexible.
    b label: label.
    b script: 'target ', s.
    b
)
The buildButton:Script: method, under the ‘building’ category.
Let’s test it out. Enter buildButton: '1' Script: 'addCharacter: \'1\'' on our
calculator morph’s evaluator and “Get it”. A button outliner should be attached
to our hands which we can drop anywhere. We can then display the button using
“Show Morph” from the object menu on the button outliner.
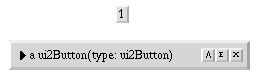
The “1” button we just created.
Now, if we click this button, we will get an error, because we didn’t define
addCharacter: for our calculator morph yet. So let’s do that now. I will place
it under the “text operations” category.
addCharacter: c = (
    "If the display shows 0 and we didn't press ., replace the display contents
     with the character we just entered, like calculators do."
    (editor contentsString = 0) && [c != '.']
    ifTrue: [editor setText: c]
    "Otherwise, simply insert the character at the cursor point."
    False: [editor text insert_char: c].
    self
)
If you click the button now, you should see the it fill the calculator display
with 1s. You just learned how to hook up Morphic widgets! But wait, we’re not
done yet. We need to create a grid of buttons for our calculator like I showed
in the hierarchy earlier in this post. To do this, we will just define a new
vector on our buttonRows slot, fill each element of it with rowMorphs, and
insert our buttons to each row.
(You can get rid of the button we just created by selecting “Dismiss” from the morph menu (right-click)).
Let’s take it one step at a time. First, let’s fill out our buttonRows with
rowMorphs by evaluating the following snippet in the evaluator.
buttonRows: vector copySize: 5.
"traits integer do: is how range loops are done in Self, similar to Ruby."
5 do: [| :i. r |
    r: rowMorph copy beFlexible borderWidth: 0.
    r color: paint named: 'transparent'.
    buttonRows at: i Put: r.
    layout addMorphLast: r.
].
"Let layout know that the layout changed."
layout layoutChanged.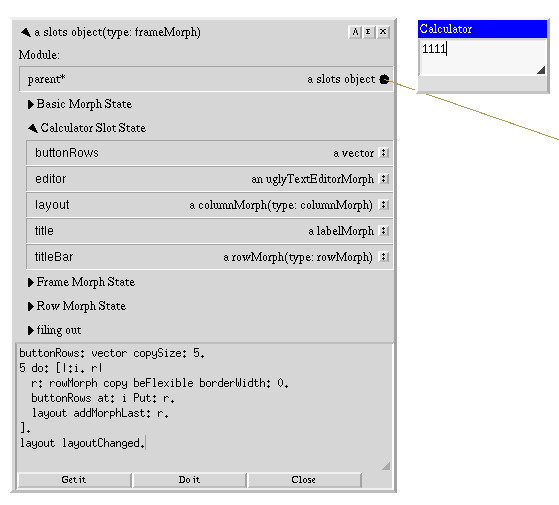
The button rows showing up as 1 pixel high morphs.
We can finally add our buttons. Since each button is unique, we’ll just add them one by one:
(buttonRows at: 0) addMorphLast: buildButton: '(' Script: 'addCharacter: \'(\''.
(buttonRows at: 0) addMorphLast: buildButton: ')' Script: 'addCharacter: \')\''.
(buttonRows at: 0) addMorphLast: buildButton: 'CE' Script: 'clear'.
(buttonRows at: 0) addMorphLast: buildButton: '+' Script: 'addCharacter: \'+\''.

(buttonRows at: 1) addMorphLast: buildButton: '7' Script: 'addCharacter: \'7\''.
(buttonRows at: 1) addMorphLast: buildButton: '8' Script: 'addCharacter: \'8\''.
(buttonRows at: 1) addMorphLast: buildButton: '9' Script: 'addCharacter: \'9\''.
(buttonRows at: 1) addMorphLast: buildButton: '-' Script: 'addCharacter: \'-\''.

(buttonRows at: 2) addMorphLast: buildButton: '4' Script: 'addCharacter: \'4\''.
(buttonRows at: 2) addMorphLast: buildButton: '5' Script: 'addCharacter: \'5\''.
(buttonRows at: 2) addMorphLast: buildButton: '6' Script: 'addCharacter: \'6\''.
(buttonRows at: 2) addMorphLast: buildButton: '*' Script: 'addCharacter: \'*\''.

(buttonRows at: 3) addMorphLast: buildButton: '1' Script: 'addCharacter: \'1\''.
(buttonRows at: 3) addMorphLast: buildButton: '2' Script: 'addCharacter: \'2\''.
(buttonRows at: 3) addMorphLast: buildButton: '3' Script: 'addCharacter: \'3\''.
(buttonRows at: 3) addMorphLast: buildButton: '/' Script: 'addCharacter: \'/\''.

(buttonRows at: 4) addMorphLast: buildButton: '.' Script: 'addCharacter: \'.\''.
(buttonRows at: 4) addMorphLast: buildButton: '0' Script: 'addCharacter: \'0\''.
(buttonRows at: 4) addMorphLast: buildButton: 'BS' Script: 'backspace'.
(buttonRows at: 4) addMorphLast: buildButton: '=' Script: 'evaluate'.
Most of these are pretty straight-forward, they just add characters to the display, but there are a few functions we didn’t implement, so let’s do that now on the traits object.
Each method is a separate slot, so make sure you create 3 new slots from the object menu.
"Resets the calculator input."
clear = (editor setText: '0').
"Removes one character at cursor point. If display is empty, set it to '0'."
backspace = (
    editor text backspace.
    (editor contentsString = '0')
    ifTrue: [editor setText: '0'].
).
"Evaluates the expression on the editor display and writes the result."
evaluate = (editor setText: editor text eval asString).
evaluate uses traits string eval to evaluate the contents of the text
display as a Self expression, which works just fine. However, Self does not have
operator precedence (because operators are just messages with special names),
and will complain if you put different operators next to each other, so you will
need to use parentheses.
And our calculator is finally done! With practice (and a lot of exploring the Morphic toolkit), it took me about 15 minutes to build it from scratch for this post.
Our finished calculator.
Making our calculator into a prototype
Of course, we built our calculator, but we built it as the “prototype” calculator: when users want to use the calculator, they should copy it and use that copy. For this, we need to set up a couple more things.
When we copy our calculator, Self will create a copy of all slots: this includes
submorphs and our reference slots. Obviously this poses a problem: now two
diverging copies of the morphs we reference exist, the value of the slot and the
submorph embedded in the morph. To solve this problem, traits morph
specializes copy to do some extra work. In particular, after copying is done,
it will call mapReferencesUsing: on each morph that has been copied with a
dictionary of old morph references to new ones. Using this dictionary we can
update our references to submorphs to the new values.
So let’s create this method on our traits object.
mapReferencesUsing: dict = (
    "Make sure the overridden call is also run."
    resend.mapReferencesUsing: dict.
    "Update each of our references."
    dict if:   layout IsPresentDo: [| :new |   layout: new].
    dict if:   editor IsPresentDo: [| :new |   editor: new].
    dict if:    title IsPresentDo: [| :new |    title: new].
    dict if: titleBar IsPresentDo: [| :new | titleBar: new].
    "Update the buttonRows vector."
    buttonRows do: [|:r. :i|
        dict if: r IsPresentDo: [| :new | buttonRows at: i Put: new].
    ].
    dict
)
However, if we copy our calculator now, we’ll find that text input doesn’t work.
This is unfortunately because of a bug in the Self environment. Normally,
uglyTextEditorMorphs are not copied with the ui2_Text morph inside but are
recreated (i.e. in evaluatorMorph). Because of this, this bug is never reached
during normal operation, but our usecase hits a bug where the
uglyTextEditorMorph goes out-of-sync with the inner ui2_Text morph. To work
around this, we can override copy and re-initialize our editor after the copy
is done.
copy = (| c |
    c: resend.copy.
    "Re-initialize our editor."
    c editor
        initializeString: (c editor contentsString)
        Style: (| color = paint named: 'offWhite' |).
    c
)
Finally, let’s make our calculator morph globally accessible, and set its
prototype so Self knows how to restore this calculator morph when we file it
back in. Open up globals, and add a new slot named calculatorMorph, then
drag the connector like we did in the previous post.
However, now I can show you a simpler way of setting up the creator slot: after
dragging the connector on our calculator morph, simply middle-click the slot on
globals and select “Make Creator”, and the object will automatically become
well-known.
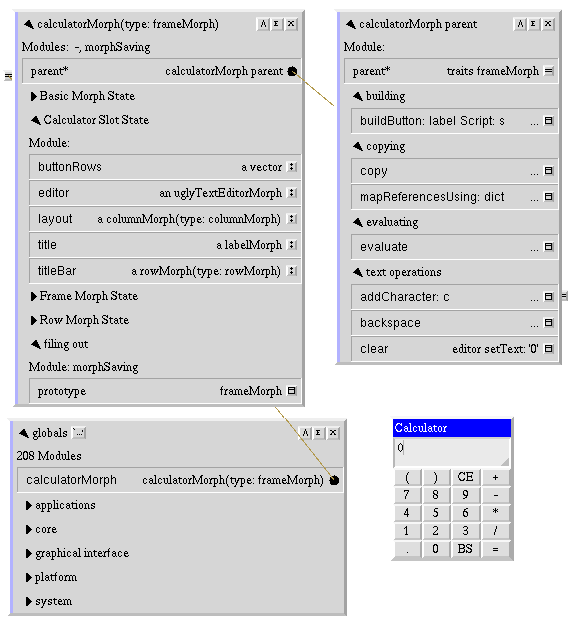
The final version of
calculatorMorph.
But you’ll notice that it says calculatorMorph (type: frameMorph). This is
because our morphTypeName is inherited from traits frameMorph. Let’s create
a new slot in our calculator traits object, and after that set prototype on
the calculator prototype object.
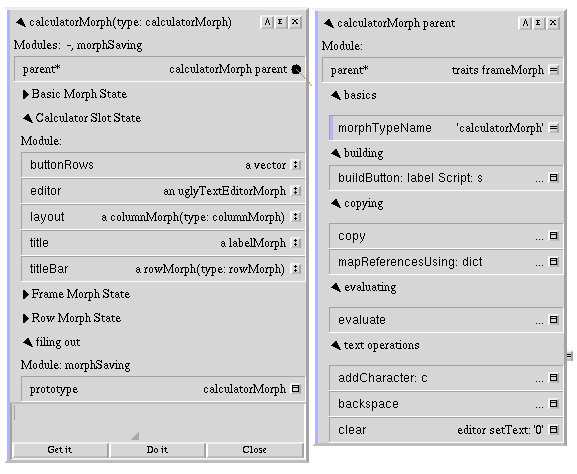
Setting
prototype and morphTypeName.
If you want, you can now apply the procedures we did in the Transporter post in order to set the modules for our new slots and file it out.
And we’re done! Thanks for reading, and I hope you enjoyed this post. Now that I’ve gotten the big stuff about Self out of the way, in my next post I can talk about some less exciting but nevertheless interesting features about Self, like digging a bit more into Transporter or looking at things like animation. Stay tuned!
-
You are obviously free to choose your own color. Evaluate
paintin the shell in order to get the possible paints you can apply to an object. ↩︎ -
When creating a new kind of morph, you might need to add new references down the line. You are not restricted by Self from adding new slots or categories. The ones I created here are simply the ones that I know we will be using. ↩︎
-
If you’re wondering why the morph didn’t immediately shrivel when
layoutis inside it like it did when we set the main morph to shrink-wrap, it’s because morphs likecolumnMorphhave aminimumWidthandminimumHeightset that prevent them from getting any smaller. You can check out their definitions to find out more. ↩︎