A tour of Self
Hey there. This is the first post I will be making here, and I wanted to give a tour of Self before making posts about my current implementation, mySelf.
Throughout this post, I will be showing examples from the regular implementation of the Self programming environment, available here.
What is Self?
To quote the Self language homepage:
Self is a prototype-based dynamic object-oriented programming language, environment, and virtual machine centered around the principles of simplicity, uniformity, concreteness, and liveness. Self includes a programming language, a collection of objects defined in the Self language, and a programming environment built in Self for writing Self programs. The language and environment attempt to present objects to the programmer and user in as direct and physical a way as possible. The system uses the prototype-based style of object construction.
Self was designed at Xerox PARC by David Ungar and Randall B. Smith in 1986, and was implemented at Stanford University. Development then continued at Sun Microsystems before eventually stopping in the early 2000s.
An introduction to Self
Self is an image-based programming language, similar to Smalltalk. It provides a programming environment that you interact with as the system is running. The runtime is based on the idea of “processes”: each piece of Self code you run has its own process (not an OS process – a Self process) in which it runs until termination. During its runtime it can interact with other objects it can reach, and create new ones.
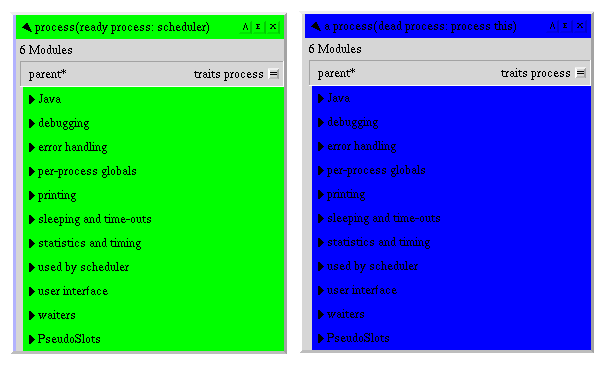
Two processes: The left one
is the scheduler (the root process), and the right one is a short-lived one
created by the shell when I typed process this and evaluated it.
Each object holds a number of slots, which can be added to and removed from (facilitated by the programming environment). Slots can be mutable, in which case they accept a message with their name and the new value as an argument.
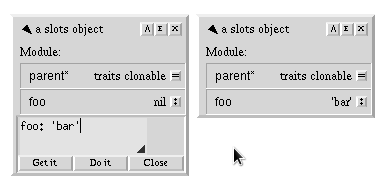
This object has a mutable slot
named foo (marked by the colon on the right). I can send it a
message like foo: ‘bar’ to set the value it points at to ‘bar’.
Constant slots (like parent above) are marked with an equals sign.
Objects can also hold code when they are assigned to a slot, in which case the slot is called a method, and the code will be executed when a message is sent to that slot. Methods can take arguments, and the keywords for each argument after the first must start with a capital letter (due to the way message precedence works in Self).
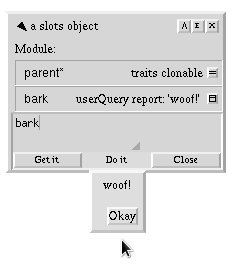
This object holds a method
called bark, which will pop up a dialog box when it receives a
message.
Self, unlike most object-oriented languages, is one which employs prototypes for inheritance (like Javascript). Prototypes are objects which are the canonical instance of a type. New “instances” are created by copying, or cloning, the prototype and modifying its properties. Cloning is the only way to create new “instances” in Self.
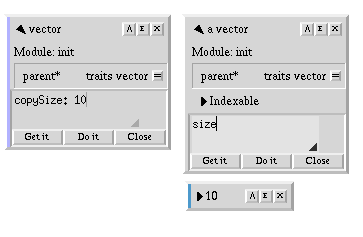
Cloning a vector. The object on the left is the vector prototype, and the one on the right is the “instance” that I have created by cloning the prototype, marked by the “a” before its name.
Now, if you know a bit about Smalltalk (and Objective-C, sort of), in the
previous picture you might have spotted that I sent a message named size in
order to get the size of the newly created vector. You might ask “how did the
vector know how to respond to size”? That’s where parent slots come in.
In the image, parent is marked with a *, which signifies that it is a parent
slot. When a message is to be sent to a Self object, first the regular slots of
the object is searched, and if the slot is not found there, the parent is
searched, and this operation continues recursively until it reaches an object
which doesn’t have a parent (for most Self objects, this is globals, which
we will talk more about later).
Note that parent slots can be mutable too. You can change the behavior of an object while it exists in Self (dynamic inheritance!).
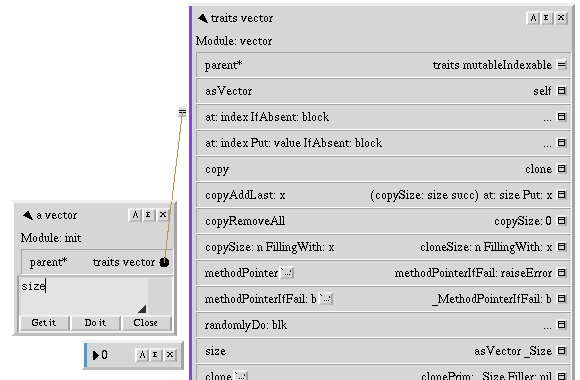
vector’s
parent slot traits vector contains the defintion for the message
size.
One more thing you need to know about is blocks, which you might be familiar
with if you know Smalltalk or Objective-C. They are objects which hold a block
of code, and they execute the code and return the value when they are sent the
value message (they are just regular objects with special syntax, after all).

A block which reports the number it is given.
This is almost all of the Self syntax. There is not much else to talk about with regards to the language itself, because the rest of the Self system is constructed in the programming environment.
The Self Programming Environment
All of the screenshots that I showed you were from Morphic, Self’s programming environment interface. In Self, the easiest way to interact with the system is by using the programming environment. The user interface is built using Morphic, which is the UI framework powering the environment, built on X11 on GNU/Linux and Quartz on macOS.
When you first start the morphic or kitchensink snapshots, you are greeted
with something like this:
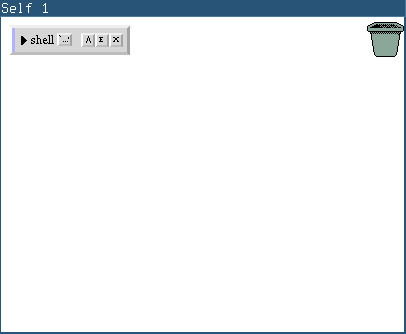
The initial window.
From here, there are a few ways you can start using the programming environment. First thing you should know is that there are usually two types of context menus for each morph (widget or layout, in modern terms) in the workspace:
- The object menu, which contains operations related to the functionality of the morph. This can be setting the target for a button, or adding a slot to the object that the outliner points to. It is opened with the middle click.
- The morph menu, which contains operations related to the morph itself, and
ways of modifying it. For instance, you can click
Resizeto resize the morph. It is opened with the right click.

The object (yellow) and morph (blue) menus.
If you want to do something to what the morph is showing, you middle click it. If you want to change the morph itself, you right click it.
The background (called world, or root) is middle-clickable, as well, and contains many important menu items. It is where you find the options to create a new object, and references to some important objects in the Self environment.
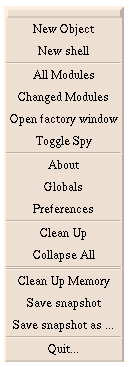
The background (rootMorph) menu.
An example
Let’s build the standard FizzBuzz as an example, going through the Self
programming environment while we do so. First off, let’s create a new object and
give it a few slots. parent will help us access the rest of the Self
environment via its value, traits oddball (trait for objects that are
one-of-a-kind, singleton if you must); n, which will be a mutable slot holding
the current number; and fizzBuzzList, which is what we will store our results
in (because we don’t have a terminal to print to). To do this, I first
middle-click the world and create a new object. Then I middle-click the outliner
(which are morphs that list the slots in an object, like an inspector) for the
new object, and select “Add Slot”. This opens an editor in which I can enter the
code for this slot. I enter the slot values for parent, fizzBuzzList and
n.
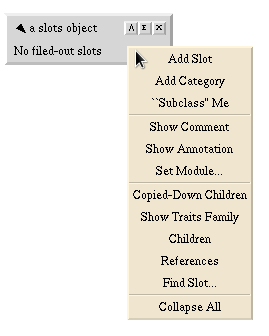
Adding a slot to the new object.
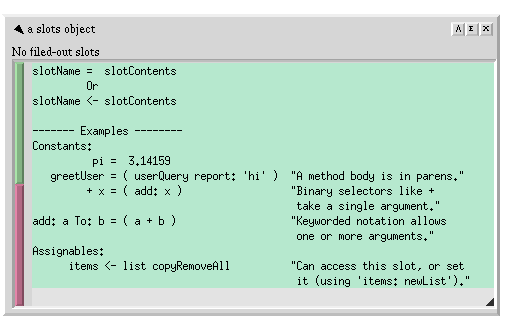
The editor for the new slot.
One thing to note is that we can do the association of slots with values
completely interactively. Let’s do this for the fizzBuzzList slot. First, I
will middle-click the world and select “Globals”, which will open the globals
object containing all world-reachable objects in Self (of which there are many).
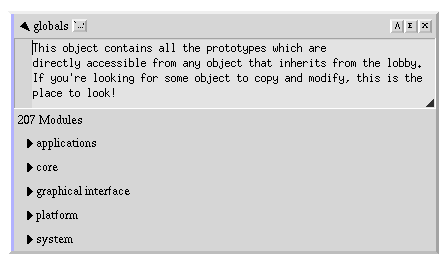
The globals object.
Then I find the object I want (sequence for storing a sequence of values),
which is under core > collections > ordered. The standard library is nicely
organized and it is a lot of fun to discover what is available visually.
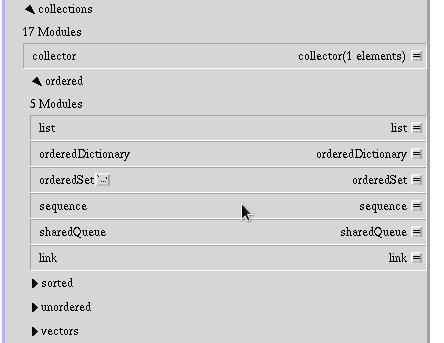
Finding sequence in globals.
We then fetch the object by clicking the symbol on its right, and create an
instance of it by opening the prompt and sending it the message
copyRemoveAll to get a sequence with no values in it.
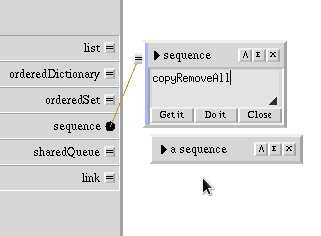
Copying the sequence prototype.
Finally, I can associate this object with the fizzBuzzList slot in my new
object. I click the symbol next to fizzBuzzList, which pulls down nil. I
then drag the connector from nil to the new sequence instance I just
created, and it is now set. Of course, this is much easier to do by setting the
value of fizzBuzzList to sequence copyRemoveAll during slot creation, but
this allows you to set the value of slots to objects that are not well-known
(cannot be reached from globals), like the instance of sequence we had just
created. Plus, it is super cool to navigate the standard libarary.
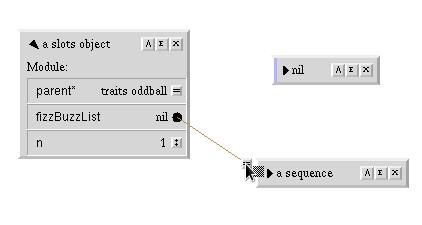
Dragging the connector to the sequence.
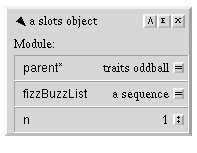
The final version of our object, with all the slots we need.
Now let’s evaluate some code to fill up that sequence. I click the “E” icon on the top right corner of the object to open up a prompt. I can then enter code here, and either “get it” (getting the result of the last statement) or “do it” (just execute the code without grabbing any value).
This is the code for FizzBuzz:
1 to: 100 Do: [| :i |
    ((i % 15) == 0) ifTrue: [ fizzBuzzList add: 'FizzBuzz' ] False: [
    ((i % 5) == 0) ifTrue: [ fizzBuzzList add: 'Buzz' ] False: [
    ((i % 3) == 0) ifTrue: [ fizzBuzzList add: 'Fizz' ] False: [
        fizzBuzzList add: i
    ]]].
].
fizzBuzzList
When I execute this code, it will do the following:
- It will first send
1theto:Do:message, creating a range loop during which our outer block will execute. - In the block, we receive a parameter called
i(denoted by the:before the variable’s name). In Self, to have control flow, we use blocks. Bothtrueandfalseaccept theifTrue:False:message with each executing the corresponding block. To have an if-else chain, we simply nest blocks. - The rest is just regular FizzBuzz: we check the modulos, and pass the correct
value to
fizzBuzzList add:. - Finally, we return the list object we just populated, so we can grab the object when we press “get it”.
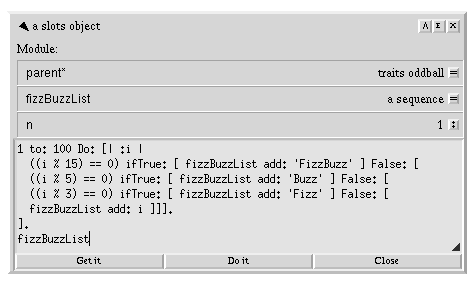
FizzBuzz in the prompt.
After we execute this code with “Get it”, it will attach fizzBuzzList to the
cursor, which we can drop somewhere to inspect. sequence stores the items in
it in an inner vector (which it wraps to expose an easy API for adding new
items in it). We can list the elements in the vector by expanding Indexable.
As you can see, the vector is now populated with the FizzBuzz game.
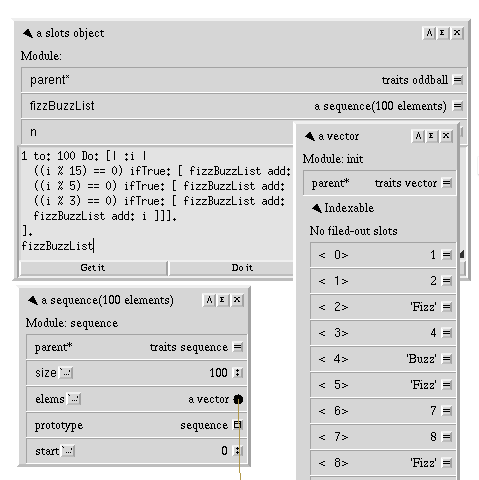
FizzBuzz game in the vector
Of course, simple programming examples are not the only thing you can do in Self. The standard library is super rich (after all, Self was developed in Sun Microsystem for a few years, who are notorious for another language with a very large standard library). In particular, the Morphic system is an extremely cool UI toolkit which I definitely want to talk more about, but I don’t want my first post to become extremely long, so I’ll end it here for now.
I definitely recommend you to spend at least some time with Self yourself.
Download it from the link at the top of this post. Currently, Self is only
available for x86, PPC and Sparc, because development stopped before ARM and
x86_64 became really popular. You can probably still emulate it with QEMU on
ARM, though I have not had a chance to try this. Before running, make sure your
/dev/ partition is mounted as exec (the reason is that Self uses an old
method of portably allocating heap memory by mmaping /dev/zero with O_EXEC
set). Then run:
$ ./Self -s kitchensink.snapI recommend the kitchen sink image because it contains everything that has been developed for Self (more stuff to play around with). However, you can also try the “morphic” and “core” images (be warned, the core image does not contain the Morphic environment!).
Now you can use what I have talked about so far to play around with objects. Use
the “Outliner for morph…” option from the menu to navigate the UI objects
themselves. The “^” button on outliners is really handy for exploring the
hierarchy of objects. You can also use “Find slot…” from the object menu to
search for messages that a given object accepts (which will traverse all parents
up to globals). Have fun! Be sure to also check out the
documentation, though I find it kind
of lackluster (in particular, it contains pretty much nothing about the huge
standard library, and much of the programming environment’s functionality is
learnt through trial-and-error, which I hope to change with these posts).
In my next post, I will showcase using Transporter, and how you can file out Self objects from your world so that it can be imported to other worlds, or checked into version control. Stay tuned!